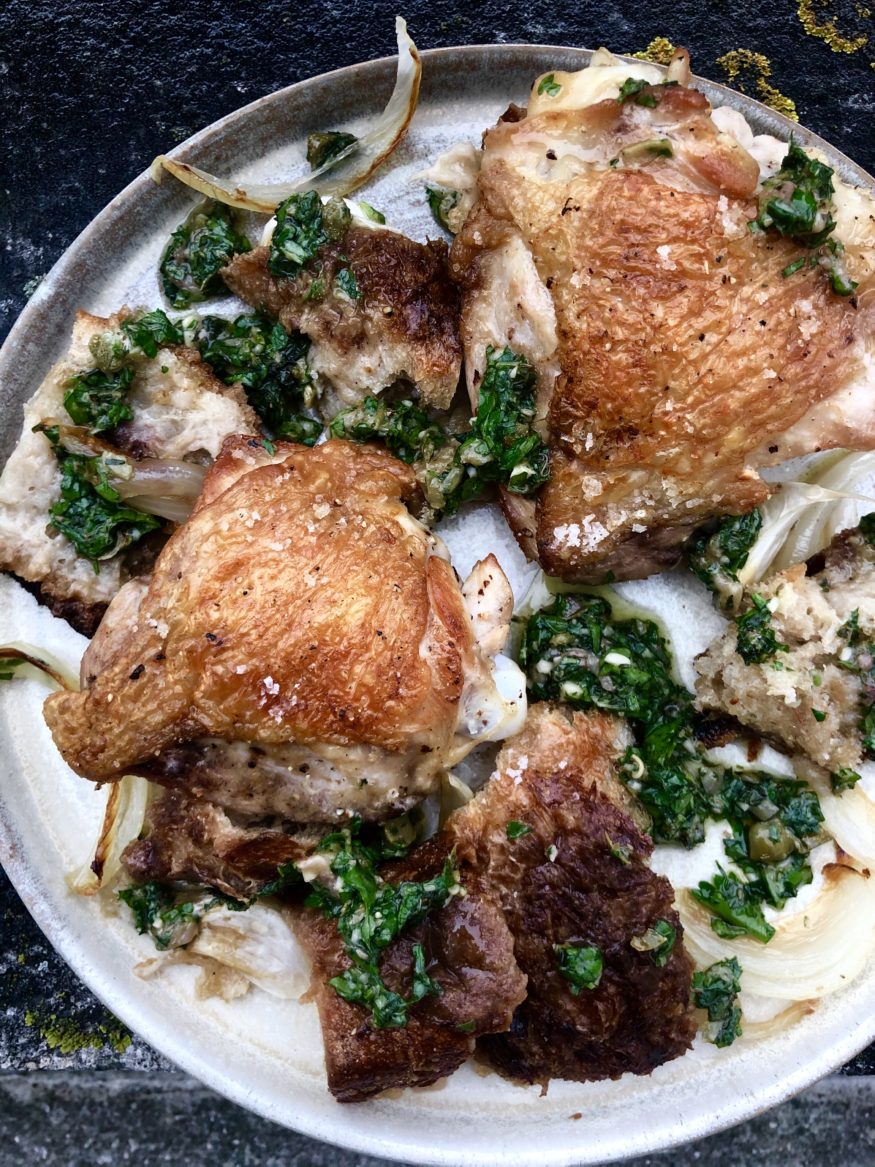
Chicken fat is wonderful stuff – I’m sure you know this already. I bought some beautiful, plump thighs from Flock and Herd yesterday with the express intention of roasting them on top of the slightly stale sourdough sitting on the kitchen counter. You may have already tried roasting a whole chicken on top of bread; the fat soaks through and creates an incredible, schmaltzy bedrock which you will find yourself uncontrollably drawn towards. I’d take it over a roast potato any day.

The zippy salsa verde with all its herbs, mustard and vinegar offsets the richness and brings its own pickle-y punch to the party. Do I like a Sunday roast? Kind of. I’d much rather have this, to be honest – more fun and around 10 x simpler.

Chicken Thighs with Chicken Fat Sourdough and Salsa Verde Recipe

6 good quality, free-range chicken thighs
200g stale-ish sourdough (mine was 2 days old) torn into large chunks
2 heads of garlic
1 onion, peeled and roughly sliced

For the salsa verde

1 large handful parsley leaves, finely chopped
1 slightly smaller handful each mint and basil leaves, finely chopped
Handful capers, finely chopped
Handful cornichons, finely chopped
3 cloves garlic, finely chopped
8 anchovy fillets, finely chopped
2 teaspoons Dijon mustard
2 tablespoons red wine vinegar
6-8 tablespoons extra virgin olive oil

Preheat the oven to 200C (fan).

Heat a large, heavy-based frying pan such as a cast-iron skillet over medium heat. Add the thighs skin side down and cook until the skin is browned – around 6-8 minutes depending on size. Set aside, leaving the fat in the pan.

Add the onions, garlic and sourdough and season lightly. Place the chicken thighs on top, skin side up and season again. Put in the oven and cook for 30 minutes, or until cooked through.

While the chicken is cooking, make the salsa verde by mixing all the ingredients together. Add a little salt if you think it needs it.

Serve the chicken thighs with some of the sourdough, garlic and onions and the salsa verde.

Yup. I’m here to tell you how to bake some potatoes. They’re a little bit fancy though – perfect for someone who’s celebrating the end of a cooking slump but also needs straight-up comfort food because she’s bored of watching everyone else have a good time on Instagram.

Social media has really done my head in recently, which is a weird thing to say because I know that’s where you’ve probably just come from. I posted a link to Instagram and you followed it? Thank you for doing that. But social media (be it Twitter, Instagram or Facebook) is a place that buoys you up when you’re up and kicks you hard when you’re down and that’s something I only tangentially understood until recently.

As I said, I’ve been in something of a rut, culinarily speaking. Coming out of it has been a little like watching a sunrise: at first, there’s a barely detectable change, incrementally increasing until a familiar warmth spreads through everything. Being creative on demand is tough until you get good at it and then suddenly there can be a period of weeks or months where you can’t grasp hold of the ideas anymore.

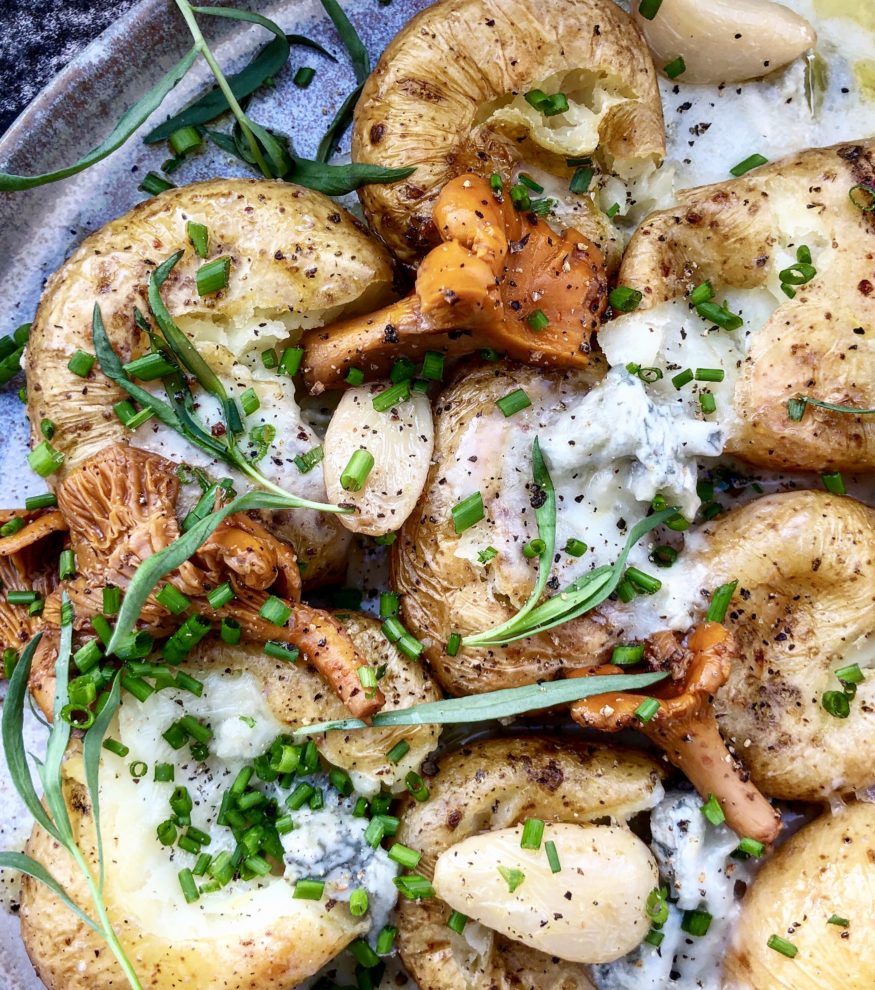
These potatoes may not be the most revolutionary idea I’ve ever come up with but they hit the spot. The confit garlic and pickled mushrooms are both very easy – it just takes an hour or so to make them both. This is perfect if you’re emerging from a cooking coma and want to potter in the kitchen of an afternoon but if you can’t be bothered then why not just roast the potatoes with some garlic? And perhaps garnish them with some shop-bought cornichons? At the end of the day, it’s just a plate of cheesy potatoes. Don’t stress.

I’ve been contacted by a few food writers over the past few weeks who’ve let me know they often experience a similar phenomenon: a malaise that starts to become a vicious circle of not cooking + feeling rubbish. I’m beginning to think it’s part and parcel of being creative, something akin to sleeping where ideas and experience assimilate into something more foundational. I hope so at least.

Today shall be spent cooking an incredible Fosse Meadows chicken we found at the market in Herne Hill, along with a beer and sourdough bolstered celeriac gratin – both of them on the barbecue. I’m back in business and I’m loving it. However, my message to any cooks out there who feel like they can only manage a Deliveroo while lying on the sofa is this: please don’t feel guilty. The love will return because it’s too deep-seated to go away for very long.

Fancy Baked Potatoes Recipe (with Gorgonzola, pickled chanterelles and confit garlic)

Serves 4

1 kg new potatoes
Gorgonzola (a few chunks per serving)
Tarragon, leaves picked
Chives, finely chopped
Olive oil
Confit garlic (see method below or alternatively, chuck some in the oven with the potatoes)
Pickled chanterelles (see method below or serve with shop-bought pickles such as cornichons)

Preheat the oven to 190C/170fan/Gas 5

Put the potatoes in a roasting dish, add a couple of tablespoons of olive oil and some coarse salt (be generous) and roast for an hour, or until tender on the inside and crisp and wrinkled on the outside.

To assemble the dish, preheat a grill.

Place some potatoes onto plates and crush lightly, then top with chunks of Gorgonzola and pop under the grill under the cheese has melted. Garnish with pickled chanterelles, confit garlic cloves, chopped chives and tarragon leaves. Extra garlic oil and salt might be a good idea.

For the confit garlic

4 bulbs garlic
Olive oil (enough to cover the garlic in the pan)

Peel all the garlic cloves and add them to a saucepan. Cover with olive oil so they are totally submerged.

Bring to a very light simmer then reduce to the lowest heat possible and cook for 40 minutes. The idea is to very gently poach the garlic, so the oil should not be bubbling. I find a heat diffuser (of the type you use for a tagine) is very handy here but it’s not necessary.

Once cooked, transfer to a clean jar and cover with the oil. IMPORTANT: It’s very important that you store confit garlic and garlic oil properly because it can breed botulism. As soon as the garlic and oil are cool, store in the fridge. Do not keep either at room temperature.

For the pickled chanterelles

150g chanterelles
150ml white wine vinegar
30ml water
3 teaspoons honey
1 teaspoon salt
Few black peppercorns
Pinch chilli flakes

In a jug, combine the vinegar, water, honey, half a teaspoon of the salt, peppercorns and chilli flakes. Stir to combine.

Put a frying pan or saucepan over medium heat and add the chanterelles (no need to add butter or oil). Cook, stirring until the mushrooms begin to release their water.

Add half a teaspoon of the salt and continue to cook, stirring, for a minute or so. Add the vinegar mixture and bring to a boil then reduce and simmer for 5 minutes then transfer to a clean jar.

Hake with Parsley and Wild Garlic Sauce

I often enjoy popping my rose-tinted glasses on and having a look back at the food I grew up with in the 80’s. Perhaps many of you have stories about grannies and apron strings but what I have is memories of things that came in boxes marked Findus or Bird’s Eye. Fond memories. In the wake of the horsemeat scandal I was delighted to trot down memory lane and revisit the Findus Crispy Pancake, which I filled with 100% horse and coated in crumb the colour of cheesy Wotsits. Yesterday, it was the turn of boil in the bag cod in parsley sauce.

I expect many of you remember this delicacy of cod and sauce ready combined inside a flappy plastic bag, which your mum simply plopped into the water and served up 15 minutes later with peas and mashed potato. It was a personal favourite of mine and so we decided to have a bash at recreating it, with some more modern-day high falutin changes, natch.

I’m a big fan of Farmdrop, which is why I had these hake fillets in the fridge, but also why I didn’t have any wild garlic, since it had failed to arrive from their supplier. I thought it would be so lovely in the sauce that I became a touch obsessed with finding some, spending two hours traipsing around local woodland with no luck; in the end, I bought some in Borough Market for the very reasonable price of ten million pounds per kilo.

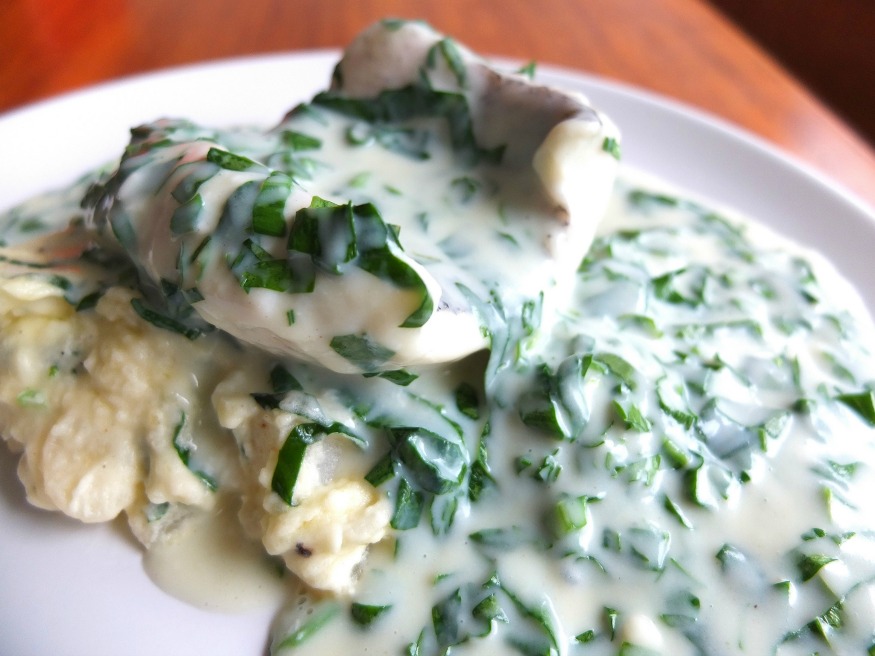
Hake in Parsley and Wild Garlic Sauce

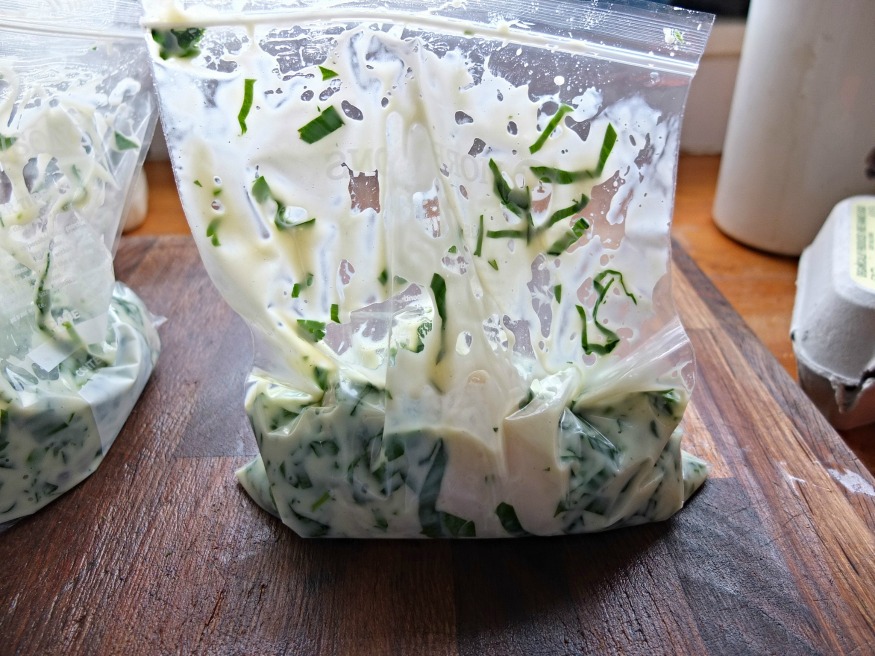
It’s very simple this recipe. Just make the sauce, cool it a bit and whack it in sandwich bags with the fish. Is it ok to cook things in sandwich bags? Apparently. I wanted to do this recipe so I didn’t ask too many questions. It’s basically like sous vide except sous vide fish is gross and slimy so we just poached it at a slightly higher temperature (using a thermometer). You could, of course, poach it separately or fry and serve with the sauce but really, you’d be letting the team down.

The mash is lumpy yes, thanks for asking. The reason for this is because we poshed it up by doing half spud, half salsify, and the latter broke our crappy potato ricer (because I bought it in Khan’s). What you see there, then, is lovely smooth mash with chopped salsify in it. We also forgot the peas.

All in all, a resounding success.

Hake with Parsley & Wild Garlic Sauce (in the style of Bird’s Eye)

This is actually incredibly delicious and there’s no reason at all for you to stuff up your mash or forget the peas. 

2 hake fillets (sorry, didn’t weigh them)
1 small onion finely chopped
2 bay leaves
5 black peppercorns
550 ml milk
30g butter
40g flour
Small handful parsley, chopped
Small handful wild garlic, chopped
The heaviest duty zip lock freezer bags you can find
You’ll also need a thermometer

Bring the milk to the boil with the onions, bay and peppercorns, then turn off and leave for 10 minutes. Strain.

In a clean saucepan, melt the butter, then add the flour to the pan, stirring constantly until it’s combined into a light brown paste. Slowly add the milk bit by bit, stirring until each addition is incorporated in the sauce. The sauce should coat the spoon, leaving a clean area for a second on the base of the pan after swiping with a spatula.

Cover with cling film, laying the film directly on the surface of the sauce. Leave to cool a bit.

When cool (you just don’t want it too hot), add the parsley and wild garlic and season to taste (it’ll take quite a bit of salt as it’s rich and creamy).

Put one hake fillet in each bag then spoon in the sauce. Bring a large pan of water up to about 40C, then push the open bags gently into the water allowing the water pressure to force the air out of the bags, once the surface of the water is just over the zip lock line, seal the bag. Bring the water up to about 56C and cook on the lowest heat for 15 mins. When ours were done the water was about 64C, so the fish was cooked through and still super moist.

Serve with mash, peas and a heavy dose of nostaglia.

Hummus and Pitta

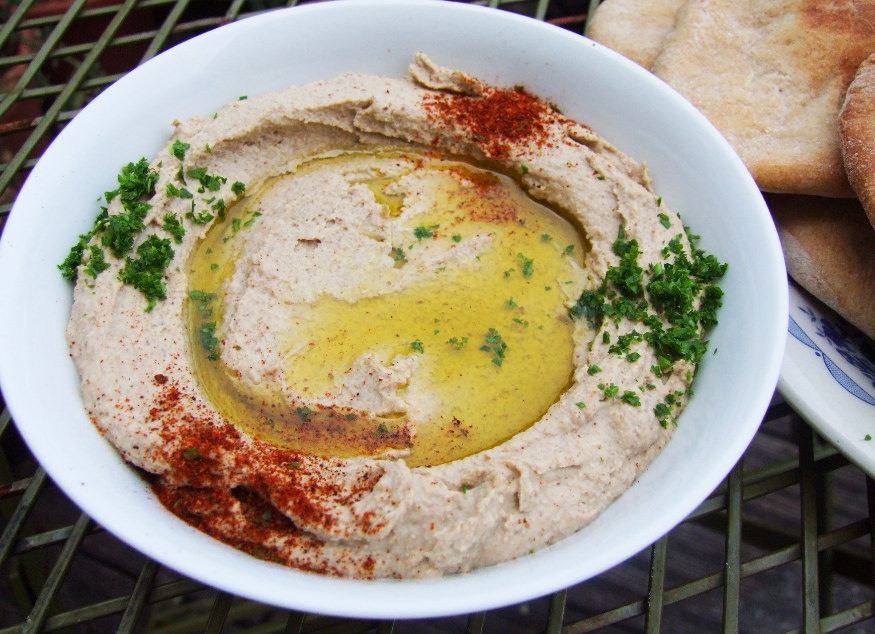
You’ve probably heard that it is really easy to make good hummus at home and that, once you’ve tried it, you’ll ‘never go back’ to the shop-bought stuff. This is rubbish. I’ve rarely met anyone in real life who hasn’t told me that their experiences of making this classic Middle Eastern chickpea slurry at home were wildly disappointing. Recipes say things like, “for a super simple, healthy supper, just whizz two tins chickpeas with 1 clove garlic, 2 tablespoons tahini, juice of 1 lemon and a glug of olive oil.” It absolutely never comes out right. It’s never smooth enough and the flavours always seem out of kilter.

I’ve been trying to make a decent version myself for years because, once I fail at something in the kitchen, I’m like a dog with a bone. Steingarten-esque in my persistence of perfection. I think I’ve cracked it but let me warn you now, you’ve got to put a little work in to get the results.

I’d been approaching the task in entirely the wrong way, viewing it as a five-minute job – whack it all in the blender and hope for the best. Really good hummus, though, is actually a labour of love.

It is essential to cook your own chickpeas. Tinned ones pong, their flesh weak and pallid. Soak the dried ones overnight in cold water with bicarbonate of soda then cook the next day; a 10-minute rapid boil and skimming plus an hours simmer should do it. If you think that’s a lot of effort then brace yourself for the next step. The creamiest texture comes from individually popping each chickpea from its papery skin; it is these tough coatings that make the hummus coarse. We’re talking one episode of Come Dine with Me (new format) to skin those suckers.

Another tip is to use the smallest chickpeas you can find. I’ve taken to these brown ones recently, they’re small and nutty, although the end result is never quite as smooth as with white peas. When it comes to blending, I do the tahini and lemon juice first, otherwise, the tahini can clump and never distribute properly and then add the chickpeas in batches with a splash of water each time. Again, it all helps to make a smooth paste. The rest is down to personal taste although of course, it’s better to add a little at a time rather than try to counteract a dominant flavour later.
Pitta Bread

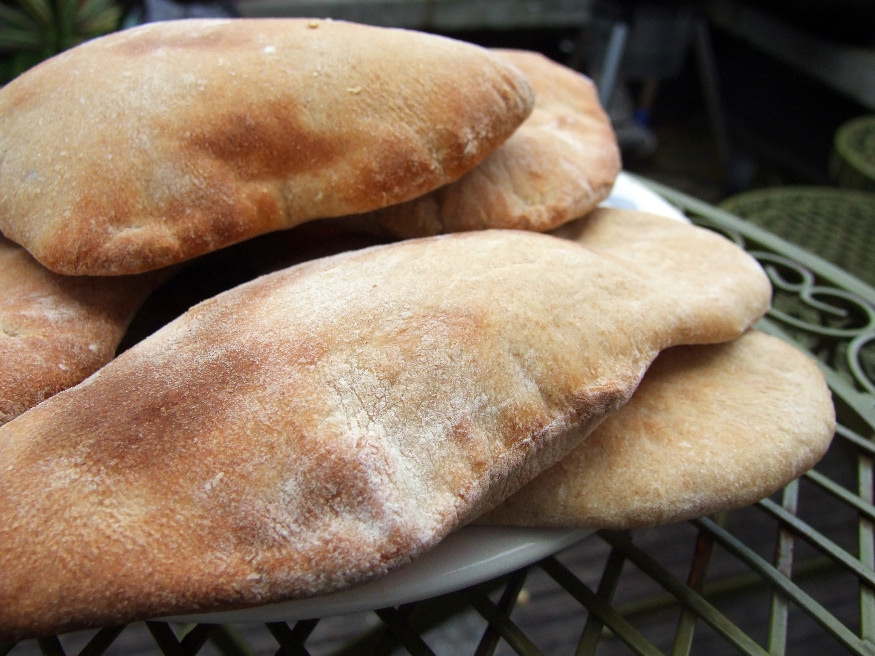
Buoyed by my success with the hummus, I decided to have a go at making pitta bread. They only needed an hour to rise and puffed up really well. Unlike the hummus, very easy to get right first time and honestly, so much better than shop-bought. Really.

Hummus and Pitta Bread Recipes

This makes a big batch but let’s face it, if you’re going to faff about skinning chickpeas then you may as well make it worth your while.

325g dried chickpeas (they will double in weight once cooked)
1 teaspoon bicarbonate of soda
5-6 tablespoons tahini
1/2 teaspoon ground cumin
Juice of 1 lemon and possibly the juice of another (at least half)
2 fat cloves of garlic
1 heaped teaspoon fine salt
Olive oil

Parsley and paprika to garnish (optional). Toasted pine nuts or whole chickpeas are also good on top.

Begin the day before, by soaking your chickpeas in cold water with the bicarbonate of soda and leaving them overnight. The next day, rinse them, cover with cold water (no salt) and bring to a rapid boil and leave for 10 minutes, skimming off the scum that rises to the top. Drain then re-cover with water and simmer for an hour – 90 minutes, until they are soft and squish easily between your fingers.

Once cool, pop each one from its skin. It takes a while but I found plonking myself in front of the telly eased the pain.

Whizz the tahini and juice of 1 lemon together in a blender until well combined, then blend the garlic and salt into the mix before adding the chickpeas, a handful plus a splash of water each time. When all your chickpeas are blended in, add a good glug of olive oil (hold the bottle over the blender for a couple of seconds), turn the blender on and leave it for a few minutes. Adjust the flavours to your taste. I find it always needs more lemon juice.

Garnish with more olive oil, parsley and paprika.

Pitta Bread (makes eight)

I used part wholemeal flour, firstly because I had some hanging around and secondly for a bit more of a robust flavour. I think it works well but you can use entirely strong white bread flour if you prefer.

220g strong white bread flour
150g whole wheat flour
1 heaped teaspoon fine salt
1 tablespoon caster sugar
1 x 7g sachet fast action dried yeast
300ml warm (not hot) water
2 tablespoons olive oil

Add the yeast to the water and leave in a warm place for about 10 minutes until frothy. This means that the yeast is activated.

In a large bowl combine the flours, salt, sugar and oil and then add the yeasty water. If you have an electric mixer with a dough hook then simply set the lot on the lowest speed for 10 minutes, adding more water if necessary, until smooth and elastic. If you don’t have a mixer, combine the mix until it comes together into a ball of dough. Again, add a little more water if necessary to bring it together. Knead on a lightly floured surface for 10 minutes until smooth and elastic.

Rest the dough in a lightly oiled bowl (so that it doesn’t stick) and cover with clingfilm or a damp tea towel and leave in a warm place until doubled in size – mine only took an hour.

After this time, knock the dough back a little by punching it a few times then divide it up into 8 pieces. Roll each into a ball, then recover for another 15-20 minutes. Preheat the oven to 200C and preheat a baking stone or baking tray (turned upside down).

On a lightly floured surface, roll out each dough ball into a pitta shape – each should be about 0.5 cm thick. Bake them on the stone or baking tray for about 5 minutes, or until golden and puffy. They are best eaten warm from the oven and they re-heat well.
Grilled Aubergines with Tahini Sauce

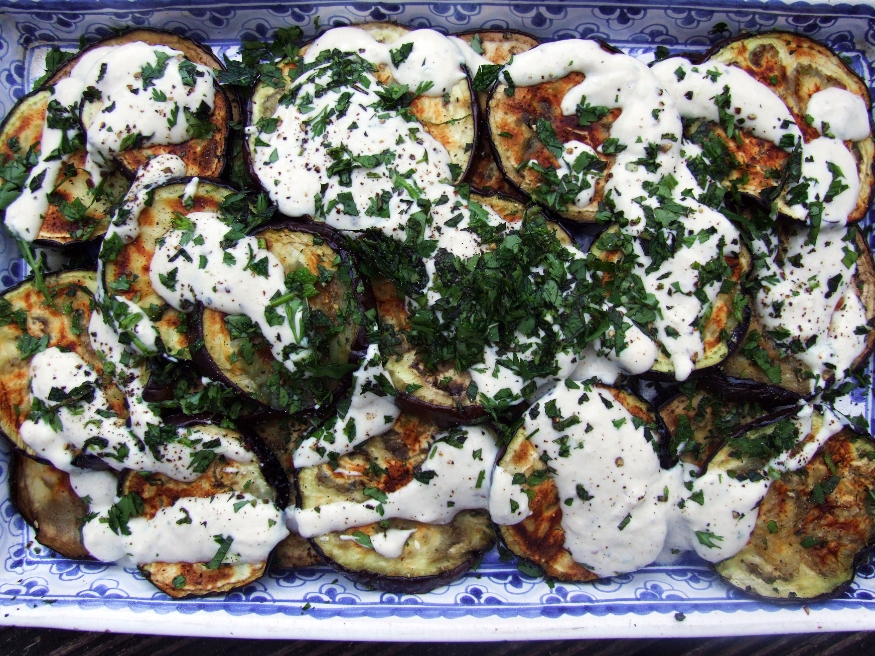
Nearing the end of  The Big Lunch* cook-off, we found ourselves flagging; we’d been cooking for 10 hours straight, only pausing to open the odd beer. There were plans for an aubergine galette and I’d toyed with the idea of baba ganoush but when it came down to it, a super quick and simple recipe was needed. I’d made this a few weeks earlier; the cool, sesame-laced yoghurt lifts the meaty aubergine into salad territory – perfect for a hot summer’s day.

It disappeared quickly at the lunch, with one guest declaring it “one of the best pieces of aubergine” he’s ever eaten. It’s the kind of dish you bust out at a BBQ; minimal effort, looks pretty and much more interesting than your average salad. You could even grill the slices on the BBQ first for extra smoky flavour.

Grilled Aubergines with Yoghurt-tahini Sauce

Will serve four people as part of a BBQ or with other salads

2 very large aubergines, sliced into 2cm thick slices

500g full-fat Greek yoghurt
3-4 tablespoons tahini paste (or to taste)
1 large clove garlic, crushed
Juice of 1 lemon
A handful of mint leaves, finely chopped
A handful of coriander or parsley leaves (or both) finely chopped
Olive oil, for grilling

Begin my brushing the aubergine slices with oil and seasoning lightly with salt and pepper. Either grill them for 5-10 minutes each side under a hot grill or do the same on a BBQ – they should be golden brown and slightly shrivelled.

While this is happening, mix the yoghurt, tahini, garlic, lemon juice and herbs (reserving a few herbs for garnish) together in a bowl. Season with salt and pepper and adjust any of the ingredients as you see fit (you may like more tahini for example). If you feel the dressing is too sour, I find a pinch of sugar never hurts. Don’t feel guilty.

When the aubergines are ready, arrange them on a plate and drizzle over some of the yoghurt sauce. Scatter with more herbs and add an extra drizzle of olive oil if you fancy it.

* The donations have continued to trickle in and so in addition to the £200 odd raised on the day, there’s another £115 plus Gift Aid on the Just Giving Page. Thanks so much to everyone who donated.

Two Garlic Soup

I actually can’t stop eating outrageous amounts of garlic. One or two cloves is no longer an acceptable amount. The obsession gently rumbles on. In contrast, I like to think that my immune system is racing ahead, building lymphocytes faster than you can say ‘flu’. In reality, rather than glowing with shiny health I’m sure I just gently whiff of garlic. Constantly.

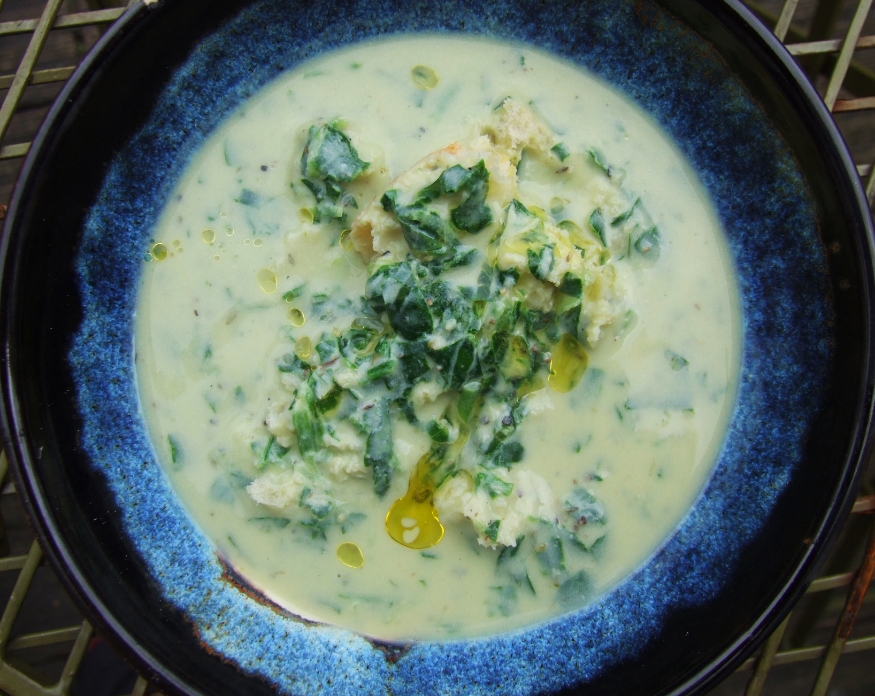
Gorgeous little soup though, even if it is rather rich. I based it on this one but reduced the amount of regular cloves, omitted the sage and added a small handful of the wild garlic I picked at Riverford Farm. The soup is interesting because it goes from looking like hot dishwater with a few pearly cloves bobbing on the bubbles to a creamy, velveteen elixir; pretty amazing considering it doesn’t contain even the merest smidgen of cream. It is instead enriched with the rather wanky sounding ‘binding pomade’ – a combination of eggs, Parmesan and olive oil. You slowly whisk the oil into the cheese and amber yolks, then a ladleful of the broth into the ‘pomade’ and then the whole lot back into the broth. It’s really rather a calming and leisurely process. I used the time to reflect on important issues such as where I might have left the key for the bin room, whether it was too early to open a beer or not and when I might find time to make Ottolenghi’s caramelised garlic tart. Actually that last one really is important.

The original recipe suggests pouring the finished soup over day-old pieces of baguette, which I did, but found the combination of rich soup and soggy bread paste rather unpleasant. Really unpleasant, actually. Like eating a piece of sodden bog roll. The second helping was much more enjoyable with a bit of traditional dunking and of course, the terminal wiping of bowl.

It is extremely garlicky but deeply savoury; the wild garlic brings its sprightly green bite. I would advise you to use good Parmesan, as it makes all the difference and a nice grassy olive oil that isn’t too strong. The finished thing is really rather pretty and spring-like I think, with a cheeky richness that makes a stealthy approach, soothing and satisfying with every mouthful.

Two Garlic Soup

(adapted from this recipe)

950ml water
1 bay leaf
1 teaspoon fresh thyme
6 cloves of garlic, chopped
1 teaspoon salt

For binding

1 egg
2 egg yolks
40g parmesan
Pepper (white might be nice actually)
50ml olive oil

Bring the water to a boil in a pan and add the thyme, bay leaf, garlic cloves and salt. Bring to the boil then turn down and simmer for 40 minutes. Strain into a bowl, then remove and discard the bay leaf and return the garlic and the infused water back to the pan but off the heat. Taste and add more salt if you like but remember the Parmesan is coming later.

Whisk the egg, the yolks, Parmesan and pepper together until creamy. Slowly drizzle in the olive oil, whisking constantly, as if you were making mayonnaise. Then, take a ladleful of the broth and do the same, whisking it really slowly into the oil mixture. Now tip the whole thing into the remaining broth in the pan and set over a low to medium heat, stirring all the time until it starts to thicken. Heidi mentions in her recipe that the creator of the original recipe, Richard Olney, says that it should be cooked, “just long enough to be no longer watery” but I agree with her that it is nicer when it’s a bit thicker.

Serve over bread or not – up to you. I prefer it not. I drizzled a bit more oil and grated a little extra cheese on top.

Other garlicky goodness:

Chicken with 40 cloves of garlic
Garlic Curry

The Best Chicken Sandwich

…FACT.

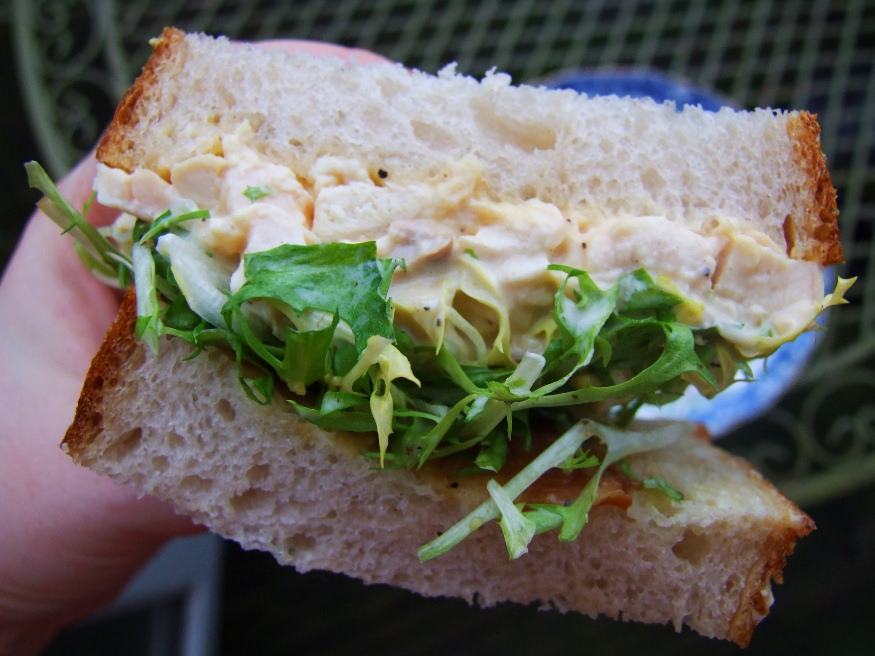
I was more excited about this sandwich than I was about the dish that made it happen – chicken with 40 cloves of garlic. That’s the kind of tunnel vision you find yourself dealing with when you’re a sandwich obsessive; always focused on where the next fix is coming from. It wasn’t just the leftover chicken that got me thinking so much as all that remaining oil – 200ml of the stuff. It struck me that this precious garlic, herb and chicken infused oil would make possibly the best garlicky mayonnaise I’d ever tasted. It did.

I’ve never mixed mayonnaise so carefully, such was the strength of my opinion that this oil was the most exquisite leftover to pass my way in a very long time. The result was a wobbly pot of  yellow goo which had ‘stick me in your face or stick your face in me right now’ written all over it. I mixed it with chunks of the leftover white and dark chicken meat and of course, lots of crispy skin bits.

It was time for The Build. This starts with the best bread you can find – I chose a classic white bloomer from the German bakery Luca’s in East Dulwich. It ain’t cheap but the bread is worth it; dense crumb, real flavour, perfect crust. Chicken-mayo mix heaps generously on one side of the sandwich and I smeared a few of those sweet roasted cloves onto the other.

With richness of course must come balance and the bitter leaves of a curly endive mixed with lemon juice and generous amounts of salt and pepper did the job perfectly.

All that could be heard for a full five minutes was chewing, interspersed by me spluttering, “best…chomp chomp…chicken…chomp…sandwich” – pieces of stray endive dropping on to my top and blobs of mayonnaise on my chin. It wasn’t pretty; I was out of control. Such is the power of a good sandwich.

My Ultimate Chicken Sandwich

First, you need to improve your quality of life considerably by treating yourself to this dish. Then you’re set to take the highway straight to leftover heaven central.

First, make your mayo. Put two large egg yolks in a clean bowl and whisk them together. Begin adding the oil a few drops at a time, whisking as you do so and making sure each bit of oil is fully incorporated before adding the next. As you whisk more oil in and the mayo starts to thicken, you can start adding the oil in slightly larger quantities until you are steadily adding it in a thin stream. The key with mayo is to be cautious with the oil until you get a feel for making it. If you add too much at once, it will split. If this happens, don’t despair. Take a fresh egg yolk in a clean bowl and begin adding the split mixture into it, very slowly, just as if it were the oil. This should bring it back.

Stop when the mayo reaches the desired thickness. Add lemon juice and seasoning to taste.

(This, by the way, is why I didn’t use extra fruity olive oil when I made my chicken, as the flavour would have been too strong for the mayo. The leftover oil is also great for roasting vegetables – particularly broccoli, and in salad dressings).

Mix the mayo with your leftover meat and heap onto one piece of bread. Spread some leftover garlic cloves on the other piece. Add some curly endive or other bitter salad leaves mixed with a generous amount of lemon juice and seasoning. Sandwich together. Eat and forget your troubles ever existed.

Chicken with 40 Cloves of Garlic

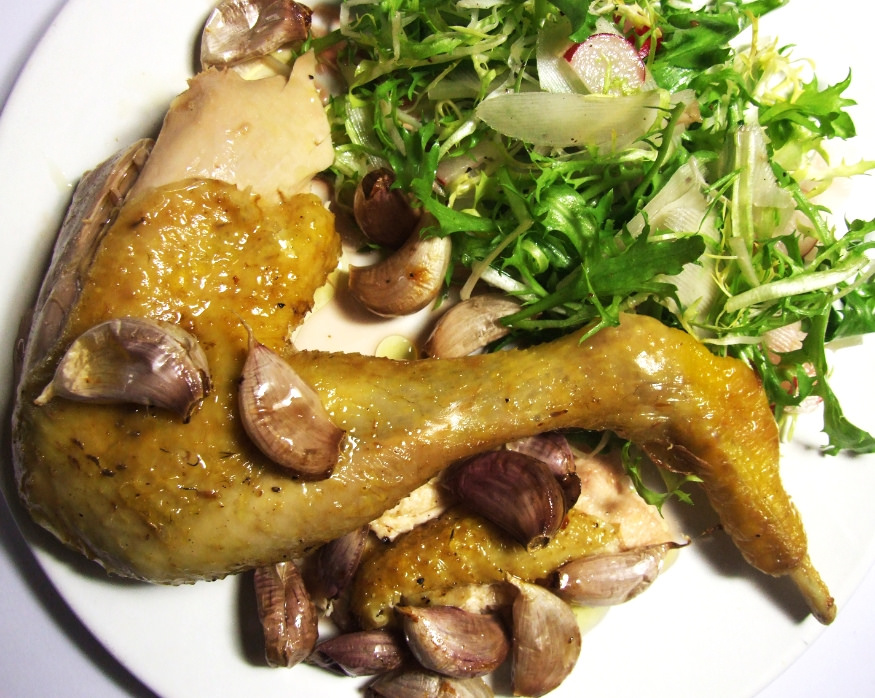
I’ll admit from the off that I was slightly scared. Not by the quantity of garlic you understand – it mellows considerably with roasting – but by the oil; 250ml of olive oil settled into a deep golden pool in the bottom of my battle-scarred roasting dish.

This dish comes from Provence, land of olive oil and garlic. A full forty cloves stew gently in the fruity elixir, and by the time the chicken is cooked, they are transformed to a soft savoury paste which can be squidged from its papery home and smeared onto the chicken, or good bread, or into mashed potato. A sprig or two of thyme and a couple of bay leaves add their own perfume and the whole heady medley gets right into that chicken – and your soft furnishings – beautifully. Febreeze, eat your heart out.

If you are thinking of making this dish – and I cannot encourage you enough to do so – then this article and this one, are definitely worth a read. There are a few controversial points to consider, such as whether to peel or not to peel when it comes to the garlic (don’t) and whether or not one should brown the chicken before roasting. I just turn the heat up at the end of cooking to crisp up the skin.

When it comes to resting, I recommend positioning her with her legs (mine spectacularly yellow, from corn feeding) sticking up in the air. This means that all the juices seep down towards the breast, leaving you with juicy meat. To serve, most recommend mashed potato but I just didn’t fancy it in the face of all that richness and made a salad of bitter curly endive dressed liberally with a lemony dressing. Juices were mopped with hunks of good bread.

The leftover oil has been a source of much excitement over the past couple of days. I can’t wait to tell you what I did with the leftovers. The carcass went into the stock pot too so that one decent chicken has been the base for three meals each for two people. It’s the gift that just keeps on giving.

Chicken with 40 Cloves of Garlic

1 chicken (mine was 1.5kg)
250ml olive oil
40 cloves of garlic or thereabouts (that’s four whole bulbs), papery bits removed but not peeled
A sprig of thyme (plus a bit extra for the cavity)
A sprig of rosemary (I didn’t use this, but it can’t be a bad thing)
2 bay leaves
Half a lemon
Salt and pepper and lots of it

Preheat the oven to 180C

Un-truss the chicken drizzle a little oil over the skin, rubbing it in. Surround it with the garlic cloves, herbs and bay, then stick the other herbs and lemon inside the cavity. Pour the oil around. Season the chicken very generously, then cover with foil and seal tightly.

Roast it for 1 hour then remove from the oven and turn the oven up to 220C.  Carefully pour out the oil into a dish (along with the garlic) then set aside and return the chicken to the tray. Roast for a further 10 minutes then rest in a bowl with legs in the air for 15.

Use this time to make a sharply dressed salad and cut some fresh bread for spreading those garlic cloves onto. Enjoy!