Pork Cheek Tacos with Blood Orange and Chipotle

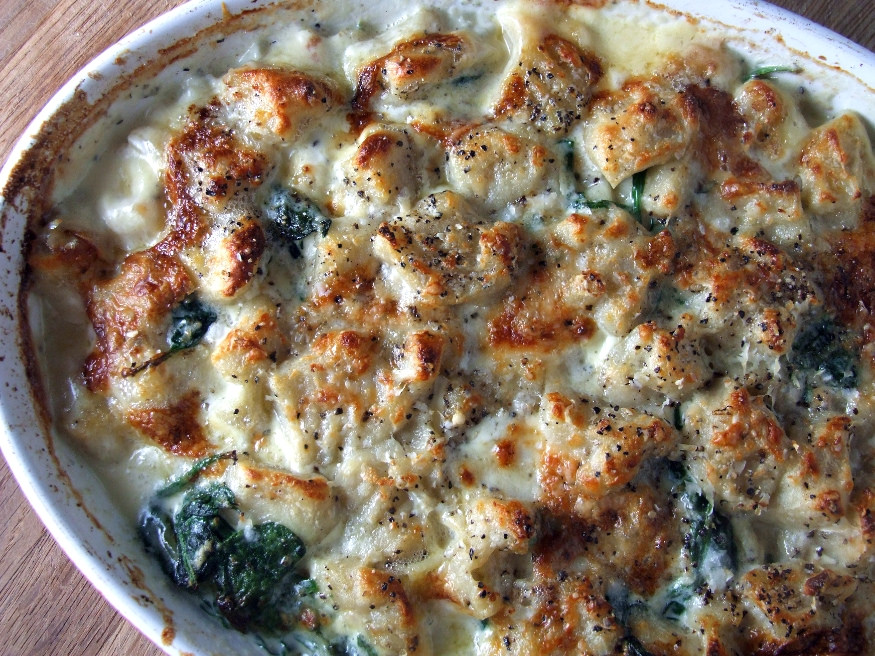
A slow-cooked meat dish always wants something to offset the richness (beef ragu with gremolata for another example), which is why I thought these pork cheeks would work well in tacos. They need leisurely cooking to melt the fat and render the meat fork-tender. I was thinking along the lines of saucy carnitas.

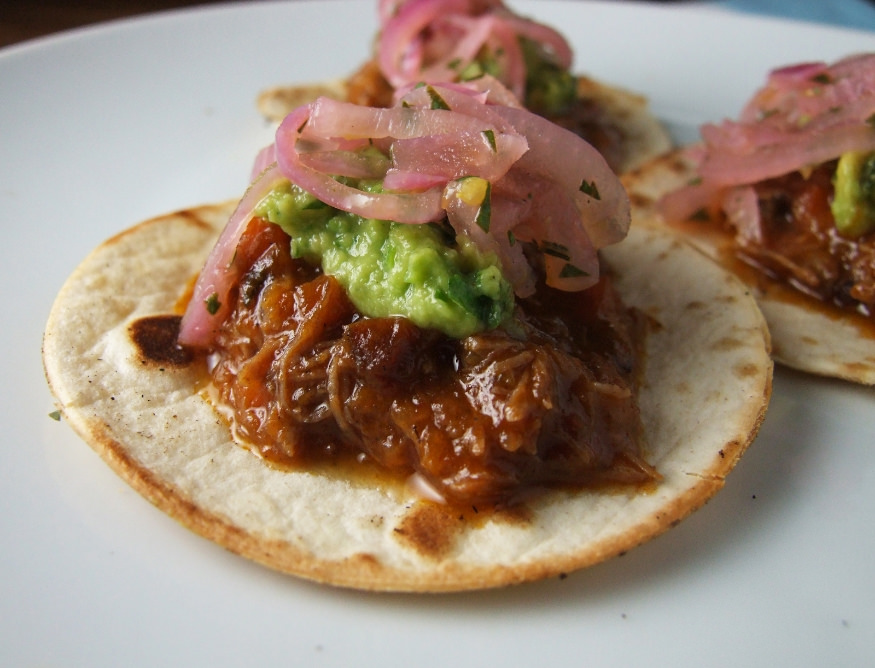
The blood oranges have hit the shops and so I used some juice to braise the cheeks, combined with Mexican spices and smoky chipotle flakes (you could also add some chipotles en adobo). After 3 hours of bubbling, the meat was coming apart in shreds and the sauce intensely flavoured; it’s probably one of the most delicious slow cooked dishes I’ve ever made. We piled it onto pan-scorched tacos and topped with lime-heavy guacamole, green chilli and Thomasina Miers’ pink onions pickled in citrus juice and herbs

The leftovers made the largest and most kick ass burrito I’ve ever eaten in my life. I would’ve been embarrassed had anyone actually seen me eating it; meat all over my hands and face. I burnt my cheek with chilli. The sauce left its indelible mark in no less than 3 places on my t-shirt. Totally worth it though, especially considering I bought 10 cheeks for £2.50. Result.

Pork Cheek Tacos with Blood Orange and Chipotle

10 pork cheeks
Juice of 1 large blood orange
4 cloves
6 allspice berries
1 cinnamon stick
1 tablespoon crushed chipotle chillies (or to taste)
1 tablespoon fresh oregano leaves
2 carrots, very finely chopped
2 onions, finely chopped
2 bay leaves
2 tablespoons tomato purée
1 litre vegetable stock (or enough to comfortably cover the cheeks; the sauce will be reduced at the end)
1 teaspoon sugar

Flour and oil for searing the cheeks

Heat a few tablespoons of the oil in a large, heavy based saucepan. Dust some flour onto a plate and use it to coat the pork cheeks by turning them over on the plate. Once the oil is hot, sear the cheeks a few at a time until brown on all sides then set aside on a plate.

Add the onions and carrots to the pan and cook for 5 minutes or so until softened. Add the spices (in a little bit of muslin if you want to be fancy and make it easy to fish them out later on), orange juice, bay leaves, oregano, tomato purée, sugar and stock, bring to the boil then reduce to a simmer. Add the pig cheeks back to the pan, put a lid on and cook on the lowest heat possible for 3 hours.

After this time, check the sauce for seasoning and add salt and pepper as necessary. Remove the meat from the sauce; it should be extremely tender and falling apart at the touch. Shred it and set aside. Fish the whole spices from the sauce then reduce it over a high heat by about two thirds. Basically you want enough to coat the meat in a rich sauce. Add the meat back to the sauce and warm through.

Serve on tacos with guacamole and onions lightly pickled in orange and lime juice with herbs. To cut tacos, use a large glass, teacup or knife to make circles from a large fajita wrap and toast lightly in a dry pan.

Egg Yolk Ravioli

Yeah, quite chuffed with these. I thought it sounded near impossible to slip an egg yolk into the centre of a ravioli and cook it without it either busting out into the water or completely over-cooking and to be honest the latter worried me more; the idea of hard-boiled yolk encased in pasta is just really, really grim.

Anyway they are actually quite easy. You have to make your own pasta of course, so it depends how you feel about that and you really will need a machine because the pasta needs to be as thin as you can possibly get it. That would be a long hard slog with a rolling pin and I ain’t no Nonna. It’s easy when you make pasta at home to be fooled into thinking you have it thin enough when you don’t, which is exactly what happened to me the first time I made these. They cooked perfectly, but the pasta was just too fat and gluey.

The next time I pushed right through to the heady heights of setting number 9 on the machine and was rewarded with papery pasta sheets. I made a spinach and ricotta mixture which doubled up as a stand to keep the yolk in place (an idea I tea-leafed from Nicky who used a ricotta and herb mix and took some incredibly good pictures). It’s important to have a large pan so you don’t overcrowd it with ravioli and to have the water at an enthusiastic simmer rather than a boil (to avoid eggy bursts). A mere 2-3 minutes will cook the pasta through (remember it’s very thin, and fresh) and the yolk will remain gooey and ooze out onto the plate creating a rich sauce.

I bathed them simply with melted butter, crushed pink peppercorns, lemon zest and some of the purple basil that my mum grew and I have somehow managed to keep alive. I love how they look all pretty and delicate but are actually packing the punches with pasta, egg and butter. They’re deceptively light in the eating too, dangerously so in fact. You’ll only want one or two per person but there’s no need to worry about not being full; it would be a crime not to mop up all those golden buttery juices with a slice or two of good bread.

Egg Yolk Ravioli

(serves 4)

200g 00 flour (strong white flour)
2 eggs
A pinch of salt

For the filling

8 small eggs
200g spinach leaves
100g ricotta
1 tablespoon grated Parmesan
Black pepper

Sift the flour into a large bowl. Make a well in the centre and crack the eggs into it. Add the salt. Bring the pasta mix together until you have a rough dough. Knead it on a lightly floured surface until smooth and silky. Wrap in clingfilm and leave to rest for half an hour.

Meanwhile, wash the spinach and without drying it put it straight into a small saucepan on a low heat and put a lid on. Steam until wilted down. Drain, then when it is cool enough to handle, squeeze as much water from it as possible and chop finely. Add to a bowl with the ricotta and Parmesan. Add some black pepper. Taste and add some salt if you like.

Roll out the pasta to the thinnest setting using a pasta machine. Cut into 16 large squares on a well floured surface (you want to leave enough room to cut around the ravioli easily without the stuffing coming out of the sides). In the middle of every other square, put a blob of ricotta mixture, then make a dimple in the centre large enough to hold an egg yolk. Make sure the sides are high enough so that the yolk won’t spill over. Crack an egg over a bowl into your hands so that you are left holding the yolk and the white drains into the bowl through your fingers. Carefully slip each yolk into the middle of the ricotta mixture.

Bring a large pan of salted water to the boil and then reduce it to a simmer. Brush some of the leftover egg whites around the edges of each ravioli and place another pasta square on top. Seal the ravioli carefully easing out any air bubbles towards the edges. Use a glass or teacup to cut each ravioli into a circular shape.

Use a fish slice to pick up each ravioli and place gently into the water. Cook for 2 minutes until the pasta is just cooked and the yolk still runny. Serve with melted butter mixed with crushed pink peppercorns and chopped lemon zest. Garnish with basil.

Sichuan Feast

My friend and I cooked this Sichuan feast for another friend’s birthday present. The power of Microsoft Word was harnessed to create a voucher entitling him to “1 Sichuan Feast cooked in your own home”, which he chose to redeem on Saturday.

When the three of us get together, you could say that we enjoy a little drinky. Now this meal took a few hours to prepare so by the time we finished we were a little under the influence. Most of the feast was delicious although there were a few misses: the spicy cucumber salad from Fuschia Dunlop’s ‘Sichuan Cookery’ was strangely bland even though I’ve cooked it 5 times before and it’s always amazing; the tripe (we weren’t sure what to do with it really) and an attempt at getting creative with a bitter melon and black fungus. We blame the booze.

There were plenty of hits though – my mate and I make a damn good team in the kitchen and we’ve got some fine feasts under our belt like this and this. We made fish fragrant aubergines which ended up more like fish fragrant pork, fish and tofu hotpot, twice-cooked pork and the hot and numbing ‘dried’ beef. The meat is not actually dried but goes through a four stage cooking process: first it’s simmered in one piece then thinly sliced; next it’s marinated in a mixture of spring onion, ginger, shaoxing wine and salt before being deep fried, rendering it like strips of  jerky, with a bit more juiciness. Those slices are addictive, as you would expect bits of deep fried meat to be and you need to resist eating them all before the final stage of simmering with soy, ginger, spring onion and sugar until the liquid has reduced to the merest lick of syrup. It’s then dressed with the hot and numbing part – ground Sichuan peppercorns and dried chillies before being sprinkled with coriander and sesame seeds. The pieces of meat have a very satisfying chew and leave a tantalising tingle on the lips.

A few hours, two bottles of champagne and a bottle of Albarino later and we went at that feast like hungry wolves. Noodles flew; hot pot broth splashed; peppercorns bounced across the floor. It must have been quite a sight. Between us we’d prepared nine dishes, had as much fun during the cooking as during the eating and made our friend happy. I call that a success.

You can see more photos from the feast on my Flickr.

Hot and Numbing Dried Beef

(from Sichuan Cookery by Fuschia Dunlop)

500g lean beef in 1 piece
Oil for deep frying, such as groundnut or vegetable oil

For simmering the beef
Small piece of cassia bark or cinnamon
1 star anise

For the marinade:
2tsp shaoxing wine
4 spring onions, white parts only
25g piece of ginger, unpeeled
1/2tsp salt

For the braising:
1 tablespoon sugar
1tablespoon dark soy
25g piece of ginger, unpeeled
3 spring onions, white parts only
1/2 teaspoon salt

For the dressing:
1 teaspoon ground roasted Sichuan peppercorns
1-2 teaspoons ground chillies/chilli flakes
2 teaspoons sesame oil
2 teaspoons toasted sesame seeds
Very small bunch of coriander leaves, roughly chopped

Put the beef in a large pan with the cassia bark and star anise, cover with water and bring to the boil. Turn down the heat and simmer until the beef is cooked then remove and set aside. Reserve the cooking water. Slice the beef into 1cm slices along the grain, then slice across the grain into 1cm wide strips. Halve any long pieces so that all the strips are roughly the same size.

Crush the ginger and spring onions a bit with the side of a knife or heavy object then chop each into 3-4 pieces. Place in a bowl with the shaoxing wine and salt, add the beef and mix really well. leave for half an hour or more in the marinade.

Heat the oil for deep frying in a deep pan. Add the beef in small batches for about 4 minutes, until the pieces are reddish broan and crisp. Set each batch aside to drain on kitchen paper. Don’t worry if they stick together during frying, they should pull apart easily.

Heat 2tablespoons of oil in a wok, until smoking. Stir fry the ginger and spring onions for 30 seconds or until the oil smells fragrant. Add 500ml of the reserved beef cooking water plus the soy, sugar and salt. Add the beef and bring it to the boil. Turn down the heat and simmer for about 30 minutes until the beef has absorbed almost all the liquid leaving a syrupy glaze coating the beef.

Mix together all the ingredients for the dressing. Arrange the beef on a serving plate and pour over the dressing then garnish with the coriander leaves and sesame seeds.

Slow Roast Shoulder of Lamb with Pomegranate Molasses

Yes I did say I was going to eat less meat in January but I had this on New Year’s Eve so ha! It’s allowed. We decided to stay in this year; basically I’ve had it with NYE, we’re through. Done. Kaput. What I mean to say is that I’m done with going out on NYE – there’s literally no worse way to start a fresh year than waking up in The World of Pain. I still managed to consume a fair amount of cava, but at least I didn’t pay silly money for each glass, or wake up on someone else’s floor after a house party with a crick in my neck and a stranger breathing stale boozy morning breath in my face.

This year my boyfriend and I got steadily sozzled in our own home while this lamb shoulder roasted slowly until the meat was falling away from the bone. I found the recipe on Becky’s blog. Pom molasses has to be the perfect marinade for lamb, all sweet and sour; the edge bits get sticky and the onions and garlic break down into the gravy. It’s almost obscene, it’s so tasty.

We stuffed it into pitta breads with some very finely shredded cabbage and a salsa I made with tomatoes, onion and my mum’s incredible pickled chillies which are packed with coriander seeds. It was basically a really posh kebab and way better than anything I could have picked up around these parts as I staggered my way home after midnight.

Slow roast shoulder of lamb with pomegranate molasses

100ml pomegranate molasses
100ml water
3 large onions, thickly sliced
4 cloves garlic, finely sliced

Leave the lamb to marinade for a few hours in the pomegranate molasses. I made a few slits in the meat to allow the molasses to penetrate the meat and shoved a few slices of garlic into each slit.

Allow the meat to come up to room temperature before cooking. Preheat the oven to 150C.

Place the onions and garlic in the bottom of a large, oven proof lidded dish (or just cover your dish with foil, as I did). Place the lamb on top and pour over the pomegranate molasses, rubbing it into the lamb. Add the water, cover and place in the oven 3 hours for a 1kg joint (adding 20 minutes extra per 500g).

After this time, remove the lamb joint from the juices, pour the juices into a bowl and leave for half an hour to allow the fat to move to the top. Skim off the fat and discard it. Turn the oven up to 190C. Return the lamb and skimmed juice to the oven in a roasting tray. You can drizzle over some extra pomegranate molasses at this point. Cook for 30 minutes until the juices are bubbling and lamb is browned.

When cooked, pull the lamb apart and stuff into pitta breads, or whatever else you fancy. Make sure to get a good helping of that sticky sauce, too.

Stuffed Onions

The second Ottolenghi book (Plenty), is just as beautiful as the first. All the recipes are veggie, which fits perfectly with my wishy washy intentions to eat hardly any meat in January. Apart from when I eat out, which is quite a lot. I ate chicken just last night for example and very delicious it was too.

Anyway, these stuffed onions are pretty amazing. Poached onion layers are filled with feta, herbs, spring onions and breadcrumbs. The latter provide substance and are gooey and swollen with flavour from the cooking stock. We ate some of them on their own with a salad then immediately ate the rest from the baking dish with our hands. The most unexpectedly rich and comforting dish I’ve eaten in a very long time.

Ottolenghi’s Stuffed Onions

(in theory, they could serve 4 but there’s no chance to be honest. Serves 2). I’ve also made his black pepper tofu from the same book.

500ml veg stock
350ml white wine
4 large onions
3 small tomatoes
120g white breadcrumbs
90g feta, crumbled
80g parsley leaves, finely chopped
3 tablespoons olive oil
3 spring onions, finely chopped
3/4 teaspoon salt
Black pepper

Butter, for greasing the dish

Preheat the oven to 180C and grease a baking dish with butter.

Combine the wine and stock in a saucepan and bring to the boil. While this is happening, trim the top and bottom from the onions, cut them lengthways in half and remove the skin. Carefully remove most of the insides to leave 3 or 4 outer layers of onion. Carefully separate these. Turn the stock to a simmer and put the onion layers in it, a few at a time. Cook them for 3-4 minutes or until just tender then set aside. Keep the stock.

To make the stuffing, grate the tomatoes into a bowl using a coarse cheese grater. Most of the skin will be left behind in your hands and you can discard it. Add the feta, breadcrumbs, parsley, olive oil, spring onions, salt and some pepper. Mix well.

Fill each onion layer generously and roll into a ‘fat cigar shape’. Place fold side down in the dish. Pour over about 75ml of the stock. Bake for 45-50 minutes or until they are brown and charred in places and bubbling underneath. You can add more stock if they look like they’re drying up during cooking. Serve warm.

24380258491_5514d25039_b

Now I know you’re all thinking about diets, detox and exercise. So am I. Let me lead you astray for a moment though as I reminisce about this baked gnocchi I made for my boyfriend’s birthday. We’d started with a venison carpaccio to keep space inside for this baked behemoth – home made gnocchi crisped on top and creamy down under, oozing wads of Gorgonzola.

I’d not made gnocchi at home before and I was startled at the difference; they were very light compared to shop-bought. I was careful not to add too much flour to the mixture because that makes them tough, apparently. Then again, too much potato and they may fall apart during cooking. Many recipes stated so many different ratios of potato to flour that in the end I threw up my arms, huffed and stomped. Then I remembered that bible of Italian cooking, The Silver Spoon. Their recipe suggested 1kg  potato to 200g  flour which of course worked an absolute treat.

Baking gnocchi is a bit like frying or baking pasta, adding another texture on top. I used a creamy rather than piccante Gorgonzola as I wanted it nice and gooey; the cheese basically forms the sauce along with a splash of double cream for good measure. The spinach worked well although you could use chard, cavolo nero or other greens instead. A sharp, lemon dressed salad on the side will balance the richness. In your face, detox!

Baked Gnocchi with Gorgonzola and Spinach

1kg potatoes
200g plain flour, plus extra for dusting
1 egg, lightly beaten
Salt

Steam the potatoes for about 25 minutes, or until tender. Mash with a potato ricer or beat with an electric whisk (as I did) until perfectly smooth. Stir in the flour, egg and a pinch of salt and knead to a soft, elastic dough. Shape the dough into long sausages about 1.5cm in diameter. Cut into 2cm lengths. Press each gnocchi with a fork or the underside of a grater and set aside on a tea towel dusted with flour in a single layer.

Bring a large pan of lightly salted water to the boil and cook the gnocchi, a few at a time, until they rise to the top. Remove them and drain.

For the sauce

Gorgonzola (as much as you dare, I wasn’t really in a measuring mood. Probably used about 250g).
Double cream (again, wasn’t measuring. Look, there’s no way this can go wrong so don’t worry too much about quantities. Probably about 100ml).
Spinach, 200g (ha! I knew that one)
A little Parmesan for the top
White pepper, black pepper and salt

Preheat your oven to 180C

Wash your spinach and then, without drying it, put it into a saucepan on a low heat. Put a lid on. Let it wilt then drain it well and squeeze to rid it of some moisture (if you use more cabbage-like greens such as chard or cavolo nero you’ll need to cook them in boiling water). Put your cooked gnocchi into a baking dish, break up your cheese and spread it about; do the same with the spinach then pour over your cream. Season with white pepper, salt and black pepper. I think the two types of pepper makes a difference but you could leave one out. Grate over a little Parmesan and bake for 30 minutes or until golden brown and bubbling.