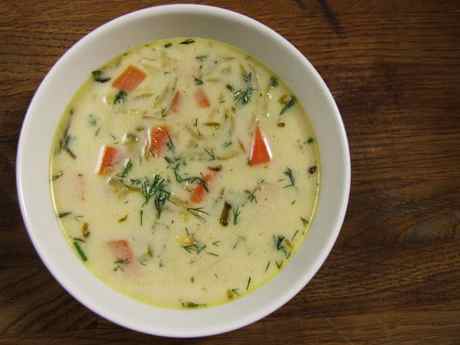
Archive for May 2008


Pistachio, Cointreau & Peppermint Opera Cake

May 28th, 2008 — 8:27pm

Phew! This cake, my second challenge as a Daring Baker, was probably the most ‘difficult’ recipe I have ever cooked. My style is not one of fine technical skill or finesse, it is more on the simple, light and fresh side. Don’t get me wrong, I like a bit of chocolate but this is hardcore.


So (deep breath), here’s what the Opera Cake consists of – the joconde (a thin cake made with ground nuts), brushed with syrup and followed by a layer of buttercream, then more joconde and syrup, more buttercream, more joconde and syrup, a layer of white chocolate mousse and finally (because that’s just not enough), a white chocolate glaze. A traditional opera cake contains darker chocolate and coffee flavours with an almond joconde, which I would love to try – as long as someone else makes it. For this challenge, we were allowed to substitute flavours, so long as the flavours remained ‘pale’ and the chocolate white. I made a pistachio joconde, a peppermint syrup, vanilla and orange zest buttercream and white chocolate and Cointreau mousse.

Here’s how I went wrong. The joconde, for some reason (I don’t know), refused to cook properly in the centre. I used the right size pans, the right oven temperature, the right method but it just started burning on top and stayed ultra-gooey in the centre. It was either my oven – very likely – or it was the type of nuts I used. Either way, I ended up removing the cakes from the tin, turning them over and re-baking them until they firmed up dammit! Eventually, it worked but that put me back about an hour what with all the deliberation over how to ‘sort it’, and I spent five or so hours making the entire cake. Next problem was the buttercream. I managed to make this the night before and everything was fine. When I came to re-beat it for use on the cake however, it had split. I read on the forum that, if this happens, the solution is to beat it and just keep going until you think the motor will blow on your mixer – eventually it will come back to a luscious buttercream and miraculously, it did!

Dramas over, the other components were pretty simple but I must admit, the whole thing was way too sweet for me. You need an occasion for a cake like this, a small slice is definitely enough. That said, Chris loved it – but it beat him in the end and I’m ashamed to say that some did get wasted. Although I didn’t really like the cake, I’m still very glad that I joined the Daring Bakers. I’m making things I would never have considered before and having mini cooking adventures. I love the fact that there are hundreds of people around the world all attempting this cake for the same reason. I’m just not sure how many of them will be attempting it again, probably those that are a lot more competent than I am….

Pistachio, Cointreau and Peppermint Opera Cake

For the joconde

(Note: The joconde can be made up to 1 day in advance and kept wrapped at room temperate)

What you’ll need:

2 12½ x 15½-inch (31 x 39-cm) jelly-roll pans (Note: If you do not have jelly-roll pans this size, do not fear! You can use different-sized jelly-roll pans like 10 x 15-inches.)
a few tablespoons of melted butter (in addition to what’s called for in the ingredients’ list) and a brush (to grease the pans)
parchment paper
a whisk and a paddle attachment for a stand mixer or for a handheld mixer
two mixing bowls (you can make do with one but it’s preferable to have two)

Ingredients:

6 large egg whites, at room temperature
2 tbsp. (30 grams) granulated sugar
2 cups (225 grams) ground blanched pistachios
2 cups icing sugar, sifted
6 large eggs
½ cup (70 grams) all-purpose flour
3 tbsp. (1½ ounces; 45 grams) unsalted butter, melted and cooled

1.Divide the oven into thirds by positioning a rack in the upper third of the oven and the lower third of the oven.
2.Preheat the oven to 425F. (220C).
3.Line two 12½ x 15½- inch (31 x 39-cm) jelly-roll pans with parchment paper and brush with melted butter.
4.In the bowl of a stand mixer fitted with the whisk attachment (or using a handheld mixer), beat the egg whites until they form soft peaks. Add the granulated sugar and beat until the peaks are stiff and glossy. If you do not have another mixer bowl, gently scrape the meringue into another bowl and set aside.
5.If you only have one bowl, wash it after removing the egg whites or if you have a second bowl, use that one. Attach the paddle attachment to the stand mixer (or using a handheld mixer again) and beat the pistachios, icing sugar and eggs on medium speed until light and voluminous, about 3 minutes.
6.Add the flour and beat on low speed until the flour is just combined (be very careful not to overmix here!!!).
7.Using a rubber spatula, gently fold the meringue into the pistachio mixture and then fold in the melted butter. Divide the batter between the pans and spread it evenly to cover the entire surface of each pan.
8.Bake the cake layers until they are lightly browned and just springy to the touch. This could take anywhere from 5 to 9 minutes depending on your oven. Place one jelly-roll pan in the middle of the oven and the second jelly-roll pan in the bottom third of the oven.
9.Put the pans on a heatproof counter and run a sharp knife along the edges of the cake to loosen it from the pan. Cover each with a sheet of parchment or wax paper, turn the pans over, and unmold.
10.Carefully peel away the parchment, then turn the parchment over and use it to cover the cakes. Let the cakes cool to room temperature.

For the syrup

(Note: The syrup can be made up to 1 week in advance and kept covered in the refrigerator.)

What you’ll need:

a small saucepan

Ingredients:

½ cup (125 grams) water
65 grams granulated sugar
2ml peppermint extract

1.Stir all the syrup ingredients together in the saucepan and bring to a boil.
2.Remove from the heat and let cool to room temperature.

For the buttercream

(Note: The buttercream can be made up to 1 month in advance and packed in an airtight container. If made way in advance, you can freeze the buttercream. Alternatively you can refrigerate it for up to 4 days after making it. To use the buttercream simply bring it to room temperature and then beat it briefly to restore its consistency.)

What you’ll need:

a small saucepan
a candy or instant-read thermometer
a stand mixer or hand held mixer
a bowl and a whisk attachment
rubber spatula

Ingredients:

1 cup (100 grams) granulated sugar
¼ cup (60 grams) water
seeds of one vanilla bean (split a vanilla bean down the middle and scrape out the seeds) or 1 tbsp. pure vanilla extract
zest of 2 oranges
1 large egg
1 large egg yolk
1¾ sticks (7 ounces; 200 grams) unsalted butter, at room temperature
2 tablespoons Cointreau

1.Combine the sugar, water and vanilla bean seeds or extract in a small saucepan and warm over medium heat just until the sugar dissolves.
2.Continue to cook, without stirring, until the syrup reaches 225F (107C) [*Note: Original recipe indicates a temperature of 255F (124C), however, when testing the recipe I found that this was too high so we heated to 225F and it worked fine] on a candy or instant-read thermometer. Once it reaches that temperature, remove the syrup from the heat.
3.While the syrup is heating, begin whisking the egg and egg yolk at high speed in the bowl of your mixer using the whisk attachment. Whisk them until they are pale and foamy.
4.When the sugar syrup reaches the correct temperature and you remove it from the heat, reduce the mixer speed to low speed and begin slowly (very slowly) pouring the syrup down the side of the bowl being very careful not to splatter the syrup into the path of the whisk attachment. Some of the syrup will spin onto the sides of the bowl but don’t worry about this and don’t try to stir it into the mixture as it will harden!
5.Raise the speed to medium-high and continue beating until the eggs are thick and satiny and the mixture is cool to the touch (about 5 minutes or so).
6.While the egg mixture is beating, place the softened butter in a bowl and mash it with a spatula until you have a soft creamy mass.
7.With the mixer on medium speed, begin adding in two-tablespoon chunks. When all the butter has been incorporated, raise the mixer speed to high and beat until the buttercream is thick and shiny.
8.At this point add the orange zest and beat for an additional minute or so.
9.Refrigerate the buttercream, stirring it often, until it’s set enough (firm enough) to spread when topped with a layer of cake (about 20 minutes).

For the white chocolate ganache/mousse (this step is optional – please see Elements of an Opéra Cake below)

(Note: The mousse can be made ahead and refrigerated until you’re ready to use it.)

What you’ll need:

a small saucepan
a mixer or handheld mixer

Ingredients:

7 ounces white chocolate
1 cup plus 3 tbsp. heavy cream (35% cream)
1 tbsp. Cointreau

1.Melt the white chocolate and the 3 tbsp. of heavy cream in a small saucepan.
2.Stir to ensure that it’s smooth and that the chocolate is melted. Add the tablespoon of liqueur to the chocolate and stir. Set aside to cool completely.
3.In the bowl of a stand mixer, whip the remaining 1 cup of heavy cream until soft peaks form.
4.Gently fold the whipped cream into the cooled chocolate to form a mousse.
5.If it’s too thin, refrigerate it for a bit until it’s spreadable.
6.If you’re not going to use it right away, refrigerate until you’re ready to use.

For the glaze
(Note: It’s best to make the glaze right when you’re ready to finish the cake.)

What you’ll need:

a small saucepan or double boiler

Ingredients:

14 ounces white chocolate, coarsely chopped
½ cup heavy cream (35% cream)

1.Melt the white chocolate with the heavy cream. Whisk the mixture gently until smooth.
2.Let cool for 10 minutes and then pour over the chilled cake. Using a long metal cake spatula, smooth out into an even layer.
3.Place the cake into the refrigerator for 30 minutes to set.

Assembling the Opéra Cake

(Note: The finished cake should be served slightly chilled. It can be kept in the refrigerator for up to 1 day).

Line a baking sheet with parchment or wax paper.

Working with one sheet of cake at a time, cut and trim each sheet so that you have two pieces (from each cake so you’ll have four pieces in total): one 10-inch (25-cm) square and one 10 x 5-inch (25 x 12½-cm) rectangle.

Place one square of cake on the baking sheet and moisten it gently with the flavoured syrup.

Spread about three-quarters of the buttercream over this layer.

Top with the two rectangular pieces of cake, placing them side by side to form a square. Moisten these pieces with the flavoured syrup.

Spread the remaining buttercream on the cake and then top with the third square of joconde. Use the remaining syrup to wet the joconde and then refrigerate until very firm (at least half an hour).

Prepare the ganache/mousse (if you haven’t already) and then spread it on the top of the last layer of the joconde. Refrigerate for at least two to three hours to give the ganache/mousse the opportunity to firm up.

Make the glaze and after it has cooled, pour/spread it over the top of the chilled cake. Refrigerate the cake again to set the glaze.

Serve the cake slightly chilled. This recipe will yield approximately 20 servings.

This month’s Daring Bakers challenge was hosted by Lis of La Mia Cucina and Ivonne of Cream Puffs in Venice

48 comments » | Blogging Events, Cakes, Daring Bakers, Desserts

Earl Grey and Lavender Smoked Duck

May 25th, 2008 — 8:42pm

So, we have two lavender recipes in a row – which is what can happen if you have a big bunch of delicious smelling lavender hanging around your flat, constantly triggering your food-obsessed brain off in all kinds of directions. After making the lamb, I put the remaining stems on my desk as a soothing scent to guide me through exam-hell but instead, I came up with this recipe.

I’ve been meaning to have a go at smoking duck with earl grey tea for ages as I love the flavour of bergamot and so Chris and I fashioned a steamer from a roasting tray, a cooling rack and some tin foil. I threw in some lemon zest and lavender stems and it came together really well, producing the most delicately perfumed, succulent duck. Thankfully, the lavender and bergamot were still discernible but not overpowering, a total fluke on my part as I had no idea of the right quantities.

With the smoked duck in mind, we took a trip to our local Chinese supermarket yesterday where I also spotted they sell fresh durian fruit. I’ve seen them frozen here before but never fresh. After reading Pim’s post recently, I’ve become more interested and very slightly less scared about trying one. I don’t have the nerve yet and so, apart from stocking up on kaffir lime and curry leaves, we picked up some rice wrappers to make some pancake rolls with strips of crispy spring onion, cucumber and soft, sweet mango. We dunked them in a dipping sauce of soy, rice wine vinegar, honey, chilli flakes and coriander with a touch of sesame oil.

The duck rolls were perfect for the sunny weather we had yesterday. Today, it’s raining again but that’s ok as my urban kitchen garden is getting a good soaking.There is something about growing your own food when you have limited space that is really satisfying. Here’s a couple of work in progress shots. You can see that the bay tree has sprung into action and the tomatoes are unstoppable!

We’re also growing potatoes, two plants, in a grow bag I cut into two and stood on it’s ends. If anyone tells you it’s not possible to grow potatoes on a balcony, they are wrong. Of course, I’ll probably only get a few meals but I’m still proud.

Earl Grey and Lavender Smoked Duck

2 duck breasts
A generous grind of black pepper
1 teaspoon fine salt
1/2 teaspoon ground ginger
1 star anise
The zest of 1 lemon
25g earl grey tea leaves
4oz golden caster sugar
A few sprigs of lavender, I used dried and stripped the flowers from the stems to yield about a heaped tablespoon
Rice wrappers
Your choice of fillings – we used mango, cucumber, spring onions and coriander leaves.

Preheat the oven to Gas6/200C/400F

- Score the fat of the duck in a criss-cross pattern, taking care not to slice through the meat. Mix together the salt, pepper, ginger and star anise, spread over the duck and allow to marinate for a couple of hours if possible.
- If you have a wok with a lid and a rack that sits inside, double line the bottom with heavy duty foil and do the same for the lid, leaving an overhang at the edges so that you can seal it tightly during cooking.
- Mix together the tea leaves, lavender, lemon zest and sugar and sprinkle over the bottom of the wok in an even layer. Set the rack inside, put the duck on it and heat on medium until wisps of smoke start to appear.
- Reduce the heat to low, add the lid and seal tightly, crimping the foil together like a pasty around the edges.
- Smoke for 10 minutes. Towards the end of this time, begin heating an oven proof frying pan or skillet. When the 10 minutes are up, remove the duck from the wok and put into the frying pan, rendering the fat down for about 5 minutes or so until golden brown and crispy.
- Put the duck in the oven, skin side up, for 5 minutes then remove and allow to cool to room temperature. Slice and serve with your chosen fillings.

If your wok does not have a rack, like ours, use something like a roasting tin with a cooling rack inside it and then make a domed lid using foil.

28 comments » | Barbecue, Flowers, Fruit, Garden, Gluten-free, Main Dishes, Meat, Starters, Vegetables

Lavender & Honey Lamb

May 22nd, 2008 — 7:57am

I’ve had this recipe in my head for such a long time, years, in fact. It’s not a new idea, it’s just that I’ve never cooked with lavender before. I remember mentioning it to the friend I was living with at the time only to have him look back at me with a confused expression – ‘lavender? in food?’ Oh how I wish he could taste it now! Using lavender in this way really works. Just don’t go using any you found in your local park or garden centre, it’s probably been sprayed with pesticides or some such nasty business. English lavender is apparently the best but if you live in another part of this glorious world don’t fret, you can buy it dried and be safe in the knowledge that you are just getting lavender and not a hefty dose of weed killer. We actually ended up with French Lavender. Chris works dangerously, conveniently close to Borough Market which is where he picked up the rack of lamb. Apparently, he turned around to leave the butchers (The Ginger Pig) and was standing bang opposite a shop selling lavender! Now that is definitely a sign.

The culinary God’s were truly smiling upon us as the floral, pinelike and slightly citrusy flowers combined with sweet honey and orange zest was a total winner. They would also be delicious grilled on the barbecue (I think I write that a lot don’t I?), if you have a decent one, which we currently don’t. Disposable barbecues and I have fallen out big time. A word of warning though, don’t go OTT on the lavender, it has similarities to rosemary and I suspect it will taste equally like perfume if you overuse it.

We ate the cute lollipops of lamb from my huge sharing platter with a salad made from fennel tops and leaves dressed with mint sauce. Fennel and mint is such a refreshing combination, it really wakes your mouth up. I’ve not given a recipe for the mint sauce as it’s all down to personal taste. Just finely chop some fresh mint leaves, add enough red or white wine (or cider) vinegar to loosen it to a sauce, add a pinch of salt and then sweeten to taste with sugar. This is a mint sauce you can use in the traditional way with a roast or as a salad dressing/drizzle like I have.

I also want to let you all know that Food Stories is now on Facebook! If you like Food Stories, please become a fan of our page, we are just starting out but there will be food porn (photos!), which highlight recipes from the site you may not have come across and hopefully we can get some discussions going too. If you are worried about spamming, I can promise I will only be sending minimal updates, I’m not going to message everyone each time I post or anything.That would be very annoying if you already subscribe! It’s just a place to get a little community going and show some love! To become a fan, just click the button, sign in and then click ‘become a fan’.

Lavender and Honey Lamb

1 rack of lamb, French trimmed
Zest of 1 orange
1 1/2 – 2 tablespoons dried lavender flowers (depending on the size of your rack!), stripped from the stalks
2 tablespoons honey
2 cloves garlic, crushed with some sea salt
Black pepper

Preheat the oven to 220C/425F/Gas7

- Mix the garlic, lavender, orange zest and honey in a bowl.
- Season the rack with pepper then heat a heavy based pan until very hot (until you can no longer hold your hand over it at a distance of 3″ or so for 3 seconds).
- Put the lamb in the pan, fat side down and render down the fat for about 10 minutes then flip it over for 1 minute onto the bones side just to get some colour.
- Remove from the pan and set aside. Let the lamb come back to room temperature and then brush with the lavender mixture.
- Put in a roasting tray and cook in the oven for 20 minutes then let rest for 15 for medium-rare lamb.

29 comments » | Barbecue, Flowers, Gluten-free, Main Dishes, Meat

Jewelled Farro Salad with Almonds and Orange-Raspberry Vinegar Dressing

May 15th, 2008 — 1:08pm

This is probably the best salad I have ever made. It’s so fruity, so crunchy, sweet, salty, soft and fragrant all at the same time that I’ve ditched any thoughts of modesty and am just going to shout it out there. Here’s how it happened. I was honoured to win the first ever Cookthink Root Source challenge way back in January with my recipe for Celeriac Soup with Parsley Oil and Lancashire Cheese Toasts. Just thinking about that recipe takes me right back to winter which is apparently where we are headed this weekend in the UK (again). As a prize for winning the challenge, I have received a cook book (and a Cookthink T-shirt!) called Blue Eggs and Yellow Tomatoes: Recipes from a Modern Kitchen Garden by Jeanne Kelley.

The book focuses on simple, fresh flavours. The recipes certainly aren’t challenging but are more akin to the way we like to eat everyday, uncomplicated and delicious, celebrating seasonal ingredients. I wanted to feature a recipe from the book and was drawn to these ‘Salty-Sweet-Spicy Almonds’ but, as per usual, I couldn’t just make a recipe and leave it alone, the reading of the recipe started my mind wandering in different directions which is the last thing I need right now with exams looming (any information in might squeeze information out, ok?). I wanted to incorporate the almonds into a dish rather than eating them as a cocktail snack as Jeanne suggests. So, while the sun persists, so do I with this jewel flecked farro salad. This is perfect for a barbecue side dish and most definitely for the lunchbox, which is partly what I had in mind. Salads like these keep well for a few days in the fridge and are bursting with contrasting flavours meaning your tastbuds don’t get tired.

I’ve realised that it is the contrasts in textures and flavours that are the making of a good dish. A perfect illustation of this was bestowed upon myself and Chris last night when we ate dinner at The Bermondsey Kitchen. We had both heard good things about it and so finally decided to visit. The place itself is informal, bright and airy and the service excellent. Overall, the food was good, not amazing or anything, but good. I had a charcuterie plate to start which I was relieved to find was not a towering pile of meat (sure to clog up your tubes and appetite in the space of 10 minutes) and included lomo, a Spanish cured pork fillet I’ve never eaten before but will now be searching out – somthing tells me Brindisa will have it! Chris ordered rilletes (no surprise to me nor to his family if they read this). They were excellent, really quite coarse in texture (pork) with big flavour. My main dish was delicious, plaice with blood orange butter and baby fennel. That blood orange butter was genius although I was sceptical about the seasonality issue with the oranges until Chris pointed out that the odd few still keep turning up in the veg box. “The seasons aren’t set in stone!”

The big disappointment was Chris’s main, roast pork belly with mashed potato and courgettes. The portion was massive which I feel is absolutely not the way to go with pork belly. The best belly we ever ate was in Franklin’s, our favourite local restaurant, perfectly crispy and just the right size. The Bermondsey version was vulgar and the fat was, well, not that crispy. The mashed potato was bland and so were the courgettes, he didn’t even eat more than half. The point I’ve been rambling towards all this time is that the dish didn’t contain any contrasts. These are all middle of the road flavours, there is nothing dancing around your mouth, cutting through, playing off, enhancing. Some herbs, citrus, hell anything would have improved things, it was like it came from a different chef.

Anyway, back to the salad.There is a lot of confusion over the whole spelt/farro issue – are they the same or aren’t they? Kalyn wrote about this recently and concluded that they are not. I commented on Kalyn’s post saying that a spelt seller at The Real Food Festival had told me they are one and the same but apparently this is a common misconception. I am going with Kalyn on this one as I know she’s done the research. Whatever it is, I dressed it with an orange and raspberry vinegar dressing that is so fruity it just lifts the whole dish and brings all the flavours to life. It is one of my best dressings ever. The nuts work brilliantly too, I’m so glad I tried them this way. They are fragrant with fennel seeds and hot with crushed chillies. The sticky sugar coating gives them a fantastic crunch. Tangy feta, sweet almonds, salty olives, fruity dressing. Cookthink – in sending me the book, you set me on the path to this salad and for that, I thank you deeply.

Jewelled Farro Salad with Almonds and Orange-Raspberry Vinegar Dressing

250g farro
6 spring onions, sliced
40g dried cranberries, soaked in water for 30-60 minutes
10-15 kalamata olives, sliced in half
2 pomegranates, seeds removed (make sure there is no pith)
200g feta cheese
1 small bunch mint, leaves picked and finely sliced
1 small bunch flat leaf parsley, leaves picked and left whole
15-20 almonds (see below)
1 quantity orange-raspberry vinegar dressing (below)

- Cook the farro according to packet instructions, drain and set aside to cool.
- Make the almonds and dressing (below).
- In a large bowl, mix the farro, onions, cranberries, pomegranate seeds and crumble in most of the feta.
- Add the almonds and the dressing and stir to combine. Add the herbs and mix again.
- Transfer to a serving plate and crumble over the remaining feta to serve.

Salty-Sweet-Spicy Almonds (from Blue Eggs and Yellow Tomatoes by Jeanne Kelley)
This is the full recipe. I only used about 15-20 almonds in the salad

1/3 cup sugar
1 tablespoon fennel seeds
2 teaspoons salt
2 teaspoons crushed red pepper flakes
2 cups raw almonds

Preheat the oven to 325F (170C/Gas3)
Line a baking sheet with foil and spray with non-stick cooking spray (I just wiped a film of oil over it)

- Mix sugar, fennel seeds, salt and red pepper flakes in a bowl. Add the almonds and 2 tablespoons water and stir to coat everything. Pour onto the foil and spread out in one layer.
- Bake until the sugar melts (about 5 minutes), then stir and return to the oven for 17 minutes more, stirring every now and again until golden brown.
- Remove from oven and separate with a fork. Leave to cool.

Orange-Raspberry Vinegar Dressing

Juice of one orange
1 tablespoon raspberry vinegar
1/2 to 1 clove garlic (depending on taste)
Salt and pepper
Extra virgin olive oil

- Crush the garlic in a pestle and mortar with the salt.
- Add some black pepper, the orange juice and vinegar and mix well.
- Add a couple of tablespoons olive oil (or to taste) and whisk to emulsify.

Edit: This is an entry for Margot’s Wholesome Lunchbox Event over at Coffee and Vanilla

22 comments » | Barbecue, Blogging Events, Books, Fruit, Grains, Healthy, Lunchbox, Restaurant Reviews, Salads, Side Dishes, Vegetables

Barbecued Pineapple Salsa with Mackerel

May 13th, 2008 — 7:49am

The summer is finally here! Every year I endure the same torturous wait for the British summer time to finish teasing us with the odd good day here and there, interspersed with weeks of rain and return to winter temperatures. We are yet to purchase a decent barbecue and so are making do with disposables until we get some time to browse. I’m not letting that hold me back though – the sun is out and so am I with my 1 foot square, flimsy, coal-filled tray – currently in disguise as a barbecue. Mackerel is always the first fish I think of when barbecue season arrives – or is it sardines? Maybe both the same. Those oily fish stand up so well to a good grilling and can take strong flavours – perfect for a bit of charring.

I’m a big fan of grilling everything you possibly can in the summer, which is why I always come back to this pineapple salsa. If you haven’t tried cooking fruit in this way – do – it’s super sweet and summery. I brushed the pineapple with a mixture of honey and oil, to add resilience and aid caramelisation . The honey-sweetness really enhances the flavour of the fruit, as does a good seasoning with salt and pepper. Check out Pim’s chilli-salt fruit booster for an elegant way to get the same effect. With all those punchy salsa flavours, I wanted to keep the mackerel simple, just a few coriander leaves, lemon juice and some (not so) finely shredded chilli – I was in the mood for fire!

Chris picked up the mackerel from our local fishmongers along with half a dozen oysters – a lovely surprise! A friend recently told me that it is better to serve oysters on seaweed rather than ice. This is to make sure that they don’t lose any flavour by being drowned in water should you get a bit over enthusiastic with the ice bed. We decided to use a mixture of both which looked very pretty. My friend also recommends using seaweed salt to enhance flavour and aesthetic appeal. I’ve some toasted nori stashed away and I really did mean to crumble some up with salt but the excitement got too much and I forgot. Deborah at Play with Food describes how she prepared oysters on a bed of seaweed which had little pockets of salty liquid along the stems – these could be squeezed onto the oysters for extra flavour. Love it!

I tasted my first oyster with Chris and his parents in their home in France. I remember being slightly nervous – what if I didn’t like oysters?! and really excited too. Everyone I know that loves food feels the same way about oysters. They were delicious, I haven’t looked back. We’ve been eating a few oysters recently but none have come close to the first time – it was the context that made them special. It’s such a complete sensory experience eating oysters, the beautiful shells, the pleasure of shucking and releasing the oyster and it’s liquor (Chris shucks, I release), the feel of it in your hand as you prepare your chosen seasoning and then the final experience of eating it – the delicate sequence of flavours and textures. That sounds pretentious and flowery but at least I mean it.

As we feast, we enjoy the view from our balcony, so many people in the park opposite the flat making the most of the sunshine- all the windows flung open, my ‘urban kitchen garden’ (post soon) flourishing on the balcony. I’ve got tomatoes, potatoes and herbs, lots of flowers, bay and my favourite sweet peas (just for decoration!). It’s my sanctuary away from the chaos of London. I just need some earplugs and I’m set….

Barbecued Pineapple Salsa

1 ripe pineapple, sliced fairly thick
2-3 ripe tomatoes, diced
1 red chilli (de-seed or not, up to you), chopped finely
1 small bunch coriander, chopped, leaves picked
1 small bunch mint, leaves picked and roughly chopped
Juice of 1 lime
1 small red onion, chopped
1 tablespoon honey
1 tablespoon oil (I used groundnut as it is flavourless and takes high temperatures)
Salt and pepper

- Mix the oil and honey together with a good seasoning of salt and pepper and brush over the pineapple slices. Grill on the barbecue until caramelised and charred.
- Mix all the other ingredients except the herbs in a bowl. When the pineapple is ready, cut the flesh into chunks, discarding the core and mix through the salsa. Season with salt and pepper, stir through the herbs and serve.

16 comments » | Barbecue, Fish, Fruit, Gluten-free, Healthy, Main Dishes, Salads, Side Dishes, Vegetables

Polish Cucumber Soup

May 10th, 2008 — 1:47pm

I couldn’t wait to make this soup. Given to me by a friend (his mum’s recipe), it is apparently a traditional Polish dish. The idea of a warm soup may sound a bit crazy now that summer has (finally) arrived but don’t let that put you off – I’ve heard you can also serve it chilled. I was so excited when I got this as my friends’ mum had been kind enough to specify details such as which brand of preserved cucumbers are the best (Krakus, below) – it is particulars like this which make a recipe work.


One of the most intriguing things about this soup is the method. Vegetables (carrot, parsnip, potato) are simmered in stock and water with a leg of chicken or a fatty cut of beef. At the end of cooking time, the meat is removed and my friend has noted, ‘do with it what you want!’ The cucumbers, which (importantly) are brined and not pickled, are then grated and fried in butter before being added to the pot. Cream, seasoning and dill are then stirred through, together with a little of the cucumber brine if you want a slightly more sour taste. It is this brine that makes the cukes Polish-style. The process of natural fermentation in brine is how they develop their sour taste – no vinegar involved.

As you can see we put the shredded chicken back into the soup afterwards – not part of the original recipe – we are just die-hard carnivores and couldn’t resist it. I also added quite a lot of the brine back to the pot as I really loved the sour taste. The soup was quite unlike any I’ve ever tasted before, a delicious unique flavour and so simple to make. As I understand it, there are many variations, it’s all down to personal taste.

Polish Cucumber Soup

3 pints water (I used 2 pints water + 1 pint of stock instead of the stock cube below. This is purely because I have an irrational fear of stock cubes!)
1 stock cube (if using)
284ml single cream
1 bunch dill
1 parsnip, diced
1 large carrot, diced
1 baking potato (I used 2 normal sized potatoes as I didn’t have a baker), diced
1 jar of cucumbers in brine (my friend’s mum recommends Krakus, which is the brand I used but apparently, others will do fine), drained weight 540g.
1 chicken leg (or beef but this needs to be a fatty cut)
2 tablespoons butter

-Add water, stock and chicken (or beef) to pan.
- Add the chopped veggies and simmer until meat and veggies are soft (around 30 minutes). At the end of this time, remove the meat (I shredded it to add back at the end).
- While the soup simmers, grate all the ‘cumbers’ and reserve the brine.
- Fry the cumbers in the butter on a very low heat for around 5 minutes and add to the soup.
- Finally, add single cream, dill, salt and pepper. If you want the soup to be more sour, add some cumber brine. If you want a thinner soup, add a little water. Add the chicken back in if you like.

28 comments » | Gluten-free, Meat, Soups, Vegetables

Courgette, Radish & Kohlrabi Pickle with Spring Quiche

May 4th, 2008 — 7:57pm

As soon as the first asparagus appears I jump on it and consume as much as possible during the short 8 week season. It’s partly the delicate flavour which I find slightly addictive, partly the firm texture and the way it goes SO well with ingredients like ham, egg and cheese – but I’m sure my fascination owes a lot to novelty. I know that once the season is over, I can’t eat these delicious spears again until next year. Have you ever tried out of season, imported aspragus? It’s a load of rubbish. Asparagus from Peru? What?!

I’ve been lovingly gazing at the new quiche dish since I bought it, patiently waiting for the asparagus to appear. I bought the dish a few weeks ago in a charity shop, for a few pounds. Bargain. I buy a lot of my dishes in charity shops actually – you have to be in the mood though, it’s quite a skill rummaging through all the stuff you (really) don’t want just to find that diamond in the rough. I have the whole process down to a fine art now. It’s akin to the Londoner travelling mentality, which, if you are not familiar, involves every man and woman for themselves. Well, we’re not all like that of course, but there is an element of it in every Londoner – you know it’s true! It’s just that some of us can still manage to turn the corners of our mouths upwards into a SMILE and others have fogotten the art. Some of us can also manage to be polite and considerate, but now I’m sounding preachy so I’m going to stop.

So, quiche. I used pancetta in this one, together with some melting Gruyere, sautéed shallots and vibrant radish and pea shoots. Everything is held together with an unctuous dairy mix and finished with a fine grating of fabulous pecorino, a gift from a friend recently back from Italy. This pecorino is strong and studded with peppercorns.
I wanted something to cut through the richness of the quiche and thought this might be a good time to make my entry for Pixie and Rosie’s new event, ‘Putting Up‘. My entry is basically a variation on a previous pickle recipe that I loved so much I couldn’t wait to make again. I’ve just adapted it to the season. So, here we have a courgette, radish and kohlrabi pickle. It’s slightly mustardy and sweet-sour with cider vinegar and a touch of sugar. Its like a variation on Italian pickled veggies. It gave me an excuse to break out the Kilner jars again after last years chutney and pickled onions. I also used a good pinch of the ‘long peppers’ I bought at The Real Food Festival, crushed in the pestle and mortar but you can easily leave them out.

They have a sour taste and are quite different to a regular black peppercorn, fragrant and strong. I’ve mentioned before that they are catkins, isn’t that cool? The pickle will keep for months in the fridge – at least I think it will but I don’t anticipate it lasting that long.

Courgette, Radish and Kohlrabi Pickle

600ml cider vinegar
100g sugar
1 tablespoon wholegrain mustard
1.5 teaspoons black mustard seeds
1.5 tablespoons salt

20 red radishes
3 medium courgettes
2 small kohlrabi
1 very small onion
1 small sprig of dill, finely chopped

2 regular kilner-type jars or alternatives, sterilised (to sterilise your jars, wash them in hot soapy water and then rinse under very hot water. Put into a preheated oven (140C/275F/Gas 1 – minus any rubber seals – for 10 minutes).

- Cut all the vegetables into strips by hand, with a julienne peeler or using a grater.
- Put the veg in a large bowl, add the salt and cover with cold water. Stir to dissolve the salt and leave for around an hour or so. Drain the veg and pat them dry.
- Put the dill, vinegar, sugar, mustard and mustard seed into a saucepan and gently heat to a simmer. Let simmer for a few minutes and then cool until warm.
- Pour the liquid over the vegetables then decant everything into jars. Refrigerate.

Spring Quiche

Short crust pastry (I used ready-rolled, shocking! And I can’t remember how much I used, it was enough to line a 10″ quiche dish – sorry)
150g pancetta, cubed
13 asparagus spears, trimmed (hold at each end, bend gently until they snap, discard the woody end)
2 largeish shallots, finely sliced
1 clove garlic, crushed
A small handful of radish shoots and the same of pea shoots. You could substitute any leafy shoots here, or peas.
A small handful of chives, chopped
150ml milk
150ml double cream
3 large eggs
100g Gruyere cheese, grated
A grating of parmesan (optional)

A 10″ quiche or flan dish

Preheat oven to 180C/350F/Gas 4

- Roll out the pastry to cover the dish and carefully line it, patching up any holes, even the smallest, really well.
- Line the pastry with baking paper or foil and fill with baking beans, uncooked pulses or uncooked rice.
- Cook, middle shelf for 15 minutes. Remove, take out the paper and baking beans and prick all over the bottom with a fork. Cook 10 minutes more and allow to cool while you make the filling. turn the oven up to 190C/375F/Gas 5.
- Fry the shallots with the pancetta in a dry pan for a few minutes. Add the garlic for 30 seconds or so to soften, be careful not to burn.
- Mix the milk, cream, eggs and chives together with some black pepper (no salt, the pancetta is salty).
- Add the pancetta and shallot mixture to the pastry case and spread evenly. Sprinkle the shoots on top and then the cheese. Pour over the egg mix and arrange the asparagus on top, pushing down slightly to nestle them in. Grate some parmesan over if using.
- Cook, middle shelf for 30-35 minutes until golden brown and just set in the centre.

26 comments » | Blogging Events, Eggs, Lunchbox, Main Dishes, Meat, Pastries, Pickles, Snacks, Vegetables

Back to top